Four must-try video transitions
Posted on Apr 24, 2020 by Lee Renwick
Ever filmmaker is looking for a new and interesting addition to their videos, and these unconventional video transitions will give you just that.
When it comes to filmmaking of any level, there are few things more important that editing. The edit conveys meaning, pace and tone, maintains viewer interest, presents stylistic opportunities and more. If you’ve had any experience with filmmaking before, this goes without saying.
With all this in mind, it’s no surprise that filmmakers are always looking for something more, and that’s just what these video transitions will give you, regardless of the type of videos you create.
It’s worth noting that all of these editing techniques will require planning, as they all rely on having specific shots in the bag. Really, though, it’s good practice to have a firm idea of the shots you’ll need before shooting, regardless of the cuts you’ll be using.
Whip pan
The whip pan is the first transition on our list, and it really is a great tool, both practically and stylistically. As the name suggests, the whip pan is simply a very quick pan, but it can be used to hide a cut, allowing you to join two shots in a much more seamless way than a hard cut could.
Typically, the whip pan works best in faster-paced scenes, especially when done playfully. You can try to hide the cut so the viewer won’t notice, but whipping between two shots that don’t quite line up – spatially speaking – can produce fun and stylish results.
Creating a whip pan video transition is actually very easy. All you have to do is pan rapidly out of your first shot and pan rapidly into your second shot, then in the edit, place your cut to join the two shots mid-blur. A slower shutter speed to allow for more motion blur, or even some added motion blur effect during editing can help here.
Push in
The push in is similar to the whip pan in that it’s also used to hide a cut and seamlessly join two completely separate shots, and it’s achieved through very similar means, too. To perform this video transition, you’ll need to end one shot by pushing into an extreme close-up on an object, so much so that it completely fills the frame. Then, simply begin the following shot by pulling out of a comparable close-up.
This works best when the same subject is featured in both shots. For example, you could end one shot by pushing into an extreme close up of someone’s face, then begin the next by pulling out of an identical close up to reveal their surroundings have changed.
It doesn’t have to be a human subject, of course – this will work with any two separate subjects, so long as the push in and pull out completely envelop the end and beginning of your shots.
With this cut, just like the whip pan, matching the speed of the end and beginning of your shots will produce smoother results.
Graphic match
The graphic match video transition has been around in various forms for decades. A match cut can cover many things, such as a match in movement, colour, light or sound – even the push in above could be considered a specific type of match cut. All of these options are well worth trying, but as the name suggests, the graphic match refers specifically to matching two similar shapes between shots.
The graphic match fits any pace nicely and can be used as a purely visual device, or to show a more significant shift when included in narrative video. What you match is completely up to you – it could be half the frame, like the profile of someone’s face matched with a stretch of coastline, or it could be a much smaller section, like the face of a wristwatch matched with the moon in the night sky.
When it comes to the video transition itself, you can use a hard cut or a slower fade. You may also want to crop on or both of your shots slightly, so the two shapes line up even more perfectly.
Frame block
The frame block is a fantastic video transition when done well. You pan or tilt through your shot, moving behind something that sweeps across the frame, and as you move past it, a whole new shot is revealed in its wake.
While the last three transitions can be done very simply on the timeline, the frame block requires a little more time and know-how.
When it comes to capturing the shots, the object doesn’t have to cover the entire frame like the push in, but it does have to stretch entirely from the top to bottom, or from left to right of frame, depending on if you’re panning or tilting. Your second shot – the one that’s revealed – doesn’t have any specific requirements.
This video transition can be done using any editing software with keyframes and the ability to mask. The examples below refer to Premiere Pro and iMovie, and though specific command names may vary, the editing process will be very similar. Let’s start with Premiere Pro.
Firstly, reduce the size of your video in the Program panel slightly so you have some space around your clip to work. Next, you’ll need to find the point in your clip where the object passes in front of the screen.
If your shot pans left to right, your next shot will be revealed as the right side of the object crosses frame. This means you’ll need to find the first frame that reveals anything to the right of the object.
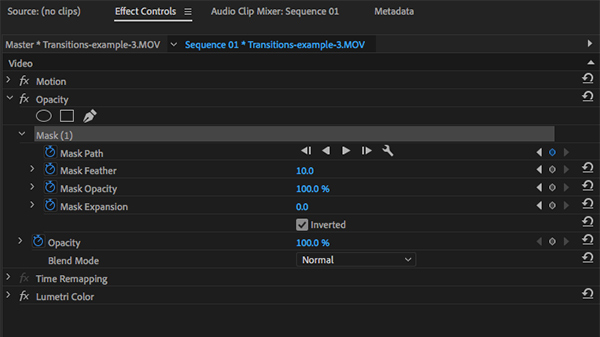
Next, select the Effect Controls menu and under the fx Opacity menu, click the Free draw bezier tool – this looks like a pen icon. You’ll see Mask (1) pop in below.
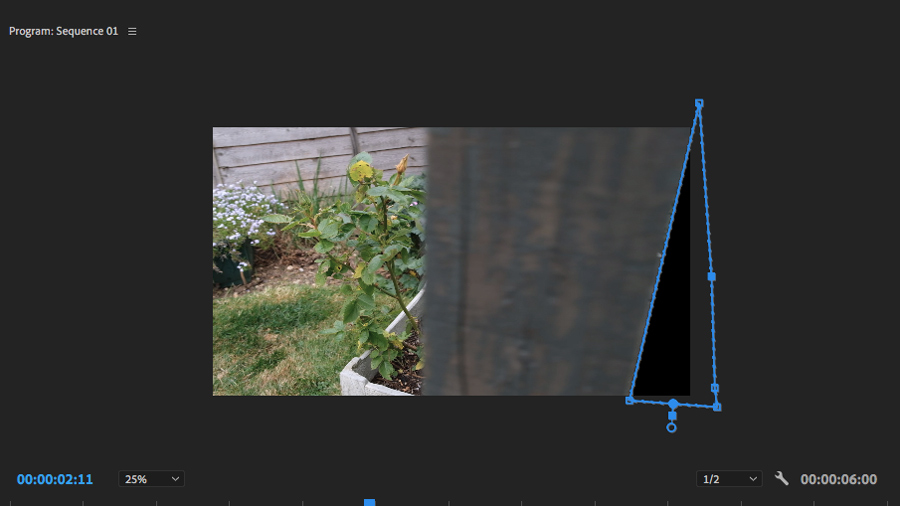
Using the tool, drop points to create a shape that covers the sliver of unwanted frame you’ve just identified. The remainder of your frame will turn black.
Back in the Effects Controls menu, ensure Inverted is checked so your selected area turns black, then click the stopwatch icon to the left of Mask Path, Mask Feather, Mask Opacity and Mask Expansion. This creates the keyframes and is absolutely essential.
Click the images to see a larger view
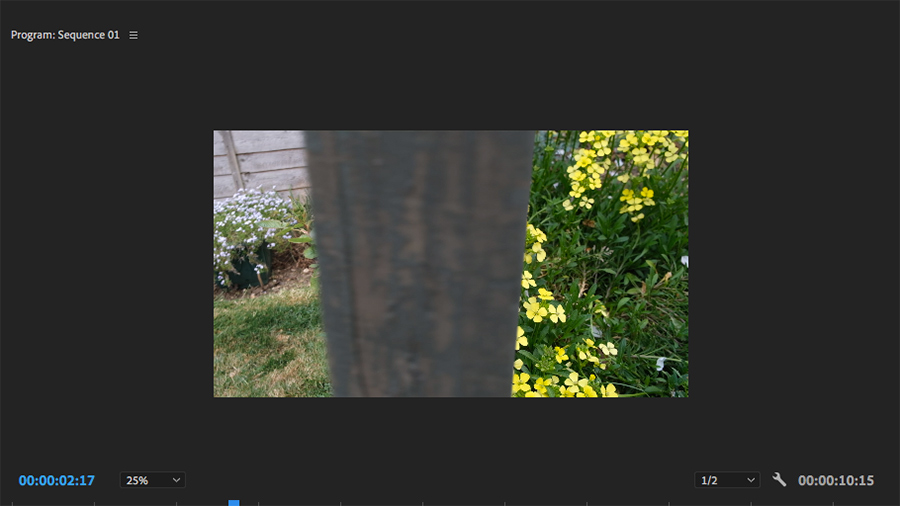
What you’re doing here is masking anything that follows your object as you pan, so whatever is underneath – soon to be your subsequent clip – is revealed as it swipes across the screen.
Now comes the real labour of love – you’ll need to adjust this mask frame by frame, ensuring it follows your object perfectly. To do this, return to the Effect Controls menu and next to Mask Path, select the Track selected mask forward 1 frame icon.
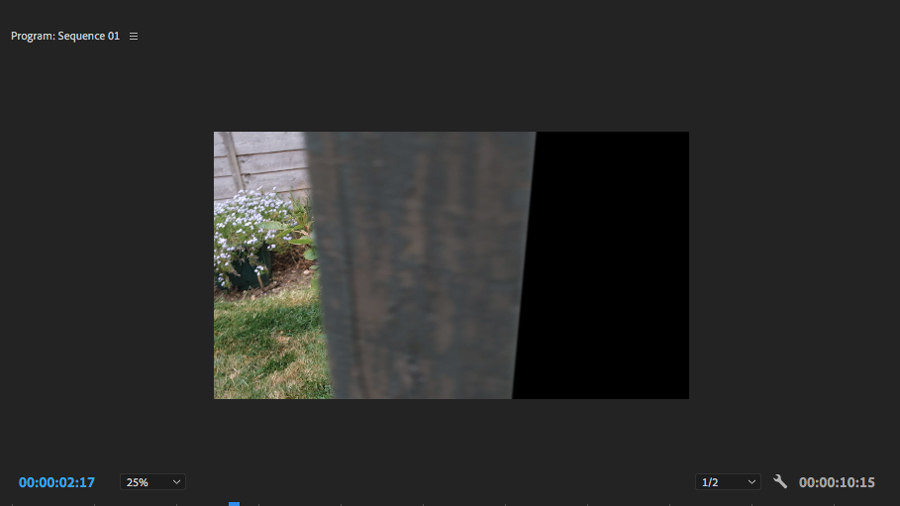
In doing this, you’ll see it advances your clip by one frame and reveals a new section of your first shot, not covered by your original Free draw bezier selection. With your mask selected, you can drag your original points and add new ones if needed to ensure anything to the right of your object is covered once again. Repeat this process until your object has left the frame and you’re left with a black, completely masked preview.
Finally, all you need to do is place your following clip on the track beneath your first clip and overlap the two, so that as your object swipes across the frame, your mask reveals the next shot.
Click the images to see a larger view
This transition can also be done with a static shot rather than a pan or a tilt, provided something moves across frame covering its full width or height in the same way. Don’t feel you have to follow a straight edge, either. Using the Free draw bezier tool allows you to conform your mask to virtually any object.
Using iMovie, you don’t have so much control, but a simple version of this transition can be achieved. Here, you’ll want to make sure the object crossing your frame is as straight as possible.
Place your second clip on top of the first and align it with the first frame you’d like to start the transition from, as outlined above. Next, in the dropdown menu, change Cutaway to Picture in Picture. This will make your second clip appear over the first in a smaller window.
Resize this window back to full frame, then drag it to the very edge so it’s correctly positioned ready to start the transition. Click the keyframe icon to add a keyframe.
From here, move through frame by frame, adjusting the position of the second clip just as you would have done with the mask above. That’s it!
Four unique video transitions, at your fingertips. Play with them, make them yours, develop them – after all, isn’t that what filmmaking is all about?
If you have any questions, you can find us on Instagram, Twitter and Facebook. Don’t forget to sign up to our newsletter! You’ll get our latest news and guides, access to exclusive offers and competitions, and you can even read our full digital issues completely free.

