Real-world Raw
An increasing number of cameras can now shoot Raw, but does it make sense for most filmmakers?
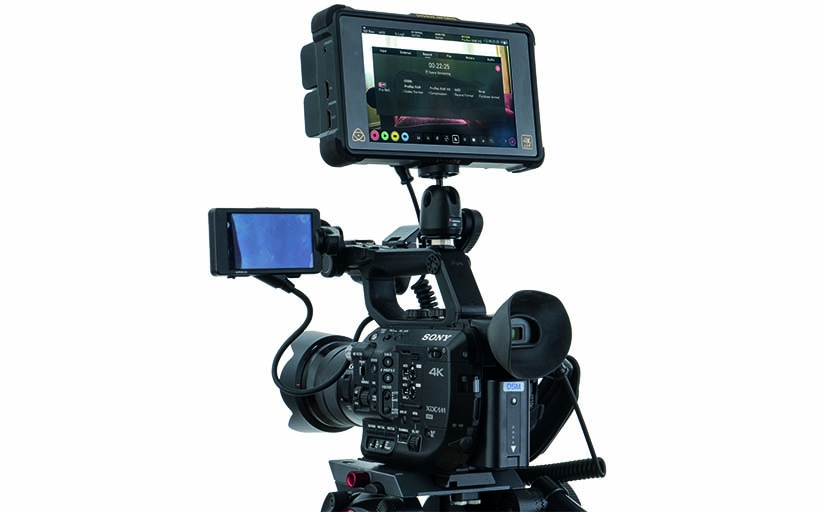
Picture An Atomos Shogun Inferno on the Sony FS5 is all you need to start recording ProRes Raw
Codec choice
Words Adam Duckworth
The majority of professional filmmakers are well aware of the theoretical benefits of shooting Raw video, where you use the best-quality information right from the sensor instead of letting your camera compress it to save space. That means in post you can set a precise white-balance, push and pull it around, and use all that highlight and shadow detail your camera can actually capture.
If you have a stills photography background, where all serious shooters use Raw, it’s actually a shock to find that almost all video cameras compress the files at capture then decompress them for viewing. That’s the compression – decompression work that a codec does.
But while stills cameras are all about the quality of the file coming from the sensor, for shooting video it’s actually more about the speed of the processor and the ‘pipeline’ to get all those Raw images off the sensor and saved. It’s OK to shoot a couple of dozen Raw stills and expect the camera to write them to a memory card without buffering and locking the camera up. It’s a whole different ball game to expect it to store thousands of Raw files at the 24, 60 or even 120 or 240 fps in video. That takes a whole lot more computing power, heat dissipation and memory card speed. Most Raw video needs exporting to a separate recorder for that reason.


Above Compared to the standard ProRes 422 footage, the ProRes Raw has so much more dynamic range. Check out the different in the sky
For video, there have been attempts at creating a Raw file format that actually works. Red has Redcode Raw, it’s own format. And Kinefinity has its own, too, as well as Blackmagic and Canon with their compressed Raw formats of Braw and Canon Raw Light respectively. These have to be opened and tweaked in their own software – DaVinci for Blackmagic or Canon’s Raw Utility – before being exported to your NLE of choice.
CinemaDNG was an attempt at an uncompressed universal format, and it even appears in cameras like the new Sigma fp as well as some Sony and Blackmagic camcorders. But the files are huge and few NLEs can read them so it’s likely you will need to totally change your workflow.
One of the biggest issues with Raw is the amount of data it uses
Perhaps the most widespread option is now Apple’s ProRes Raw, which only works if you record to an Atomos monitor. It is an attempt at a new standard in much the same way ProRes is used by lots of filmmakers, but the files are much smaller than CinemaDNG.
ProRes Raw can work on a range of cameras like Sony FS700, FS5 and FS7, Camon C500 and C300 Mark II, Panasonic EVA-1 and Varicams, plus Panasonic’s S1H and Nikon Z series of mirrorless cameras.
The number is growing all the time. But of course it’s an Apple format, so that’s OK if you edit in Final Cut Pro X. It’s not quite as easy if you use other NLEs.
While there have been plenty of scientific tests of Raw formats, it’s actually out in the field that any new technology is really put to the test. So we decided to do a couple of real-world shoots using a Sony FS5 with Sony’s Raw firmware upgrade.
It can also be set to anything from an 8-bit internal codec to full Raw, as well as ProRes Raw and the usual ProRes codecs via an Atomos Shogun Inferno, which takes large SSD media. That’s crucial, as one of the biggest issues with Raw is the amounts of data it uses.

Above On the Sony FS5 there is only one Raw to Log conversion setting and that’s S-Log 3. It’s in the General tab in FCPX
Shooting pure CinemaDNG Raw from the Sony FS5 filled a 500GB hard drive in around 15 minutes. That’s a ludicrous amount of memory space, and is way too much for most users.
So we opted for the more efficient ProRes Raw HQ. All ProRes Raw is designed to maintain constant quality, so images with greater detail or sensor noise are encoded at higher data rates and therefore produce larger file sizes.
So it’s hard to give exact sizes for ProRes Raw files, but they generally fall between ProRes 422 and ProRes 422 HQ, while ProRes Raw HQ generally falls between those of Apple ProRes 422 HQ and Apple ProRes 4444. So essentially, if you use regular ProRes files, the difference to ProRes Raw isn’t that big in terms of file space.
The reality is that, shooting normal ProRes Raw, we filled 31GB with a clip of just 2 minutes 40 seconds. We filled 350GB with 28 minutes 37 seconds. We filled 350GB with 28 minutes 37 seconds of 2K footage at 240 fps. So that would fill 500GB SSD in around 43 minutes.
It’s a step up in quality and control from any of the standard codecs, including ProRes
Shooting Raw on the Sony, you have to record in 4K, unless you are going for super-slow motion, high frame rates when you record in 2K. There is unlimited 240fps recording in 2K, while in 4K you can get 120fps, but this is in eight-second bursts only. But that’s still pretty special considering the price and age of the camera. You have to set the camera and Atomos to S-Log2, although it’s actually getting Raw data.
The files were edited on a 5K Retina iMac with a 4GHz Quad-Core Intel Core i7 with 16GB memory running MacOS Catalina in FCPX, and it struggled – as it does with many 4K files anyway. Frames were regularly dropped in playback as it struggled to keep up. Time to upgrade to a new Mac Pro if you plan to shoot Raw a lot.
The edit process is as simple as using normal files. You import clips, go to the Info Inspector and change the view from Basic to General, which then reveals the ProRes Raw controls. There is no S-Log2 option – you can either choose S-Gamut3 or S-Ganut3.cine. But you can play around with various LUTs to find a look that works for you, or create a custom one.
Working with these Raw files really opens your eyes to the amount of detail there is. You can easily recover highlight details and get some details into shadows. Noise is well controlled, but definitely there, as there is no in-camera noise suppression, so you will need to add to de-noising with a plug-in.

Above Raw files mean you can pull lots of detail our of the shadows and tweak colours with ease
The benefits of shooting Raw were apparent when we used it to film a motocross rider on a dull and cold winter’s day with a flat, white, featureless sky. The Raw shooting added some detail into the sky, and helped the colours of the bike and riding gear pop, while maintaining good skin tones. But the biggest advantage by far was shooting at 240fps with no buffering for some incredible slow motion in ridiculously high quality.
We also shot lots of B roll action on Sony A9 and A7R III mirrorless cameras at 120fps. The A9 doesn’t have Log, but has incredible AF for shooting fast action, but the A7R III does. It was pretty easy to match the footage between the cameras, although this was to get natural colours rather than any graded look. For that, the Raw from the FS5 is easy to grade but the 8-bit, non-Log A9 footage far less so.
To get an accurate comparison of how much extra detail there is, we shot a garden scene that had deep shadows and bright highlights. We used the FS5 in a variety of its formats, starting from the 8-bit internal 1080 codec right through all the standard ProRes codecs to 4K ProRes Raw in standard and HQ.
Going from 1080 HD 8-bit up to 10-bit, then to 4K and in ProRes of increasing qualities showed a definite, but relatively small increase in quality at every stage. But when you compare the basic 8-bit 1080 to any of the 10-bit ProRes files there is definitely a noticeable jump in resolution, detail and dynamic range.
But the biggest jump of all is when you go to ProRes Raw. Considering the files are roughly the same size as the biggest ProRes 4444 files, the detail and dynamic range they had truly was a big step ahead.

Above ProRes files are not as large as 12-bit Raw
If you compare a standard 4K ProRes frame to one shot in 4K ProRes Raw standard – not even high quality – then the ProRes Raw file almost looks like it’s an HDR shot, even though it’s reproduced on a Rec. 709 monitor.
The bright sky has more detail and colour, the shadows have much more details and the colours are bold without being too oversaturated. It looks far more like the scene did to the naked eye. There is more noise on the Raw shot, which you have to work on to get rid of. But overall there is a big advantage. Going to HQ increases file sizes but improvement is minimal, though. Standard ProRes Raw is all most will ever need.
Verdict
If you have the time to process the files, hard drive space to shoot ProRes Raw and computing power to edit it, then it’s definitely a step up in quality and control from any of the standard codecs, including ProRes.
If you own one of the supported cameras, an Atomos product like the Shogun Inferno and use Final Cut Pro X to edit, then Apple ProRes Raw ups the quality of your footage in a very obvious way.
If you shoot action and yearn for very fast frame rates, then 240fps with no time limit out of an affordable camera like a Sony FS5 makes Raw shooting an incredibly worthwhile option.
Apple’s ProRes Raw fives file sizes that are big, but just manageable for a lot of professionals on projects where quality is paramount.
If you don’t have one of the supported cameras, don’t like using an external Atomos recorder, don’t have the fastest computer or hard drives, feel faint at the thought of the massive file sizes and storage you need, and value speed over ultimate quality, then ProResRaw is definitely not for you right now.


